|
Pictures from the article
|
4 Wire
oxygen sensor conversion...
for all 88-91 2.0Si Preludes
Submitted by Tom Coleman (Ludicrous2.0)
This article is written for the 88-91 2.0Si Preludes, not to be confused with the 90-91 Si Models. The 90-91 Prelude Si has the B21A1 motor with a 4 wire oxygen sensor already installed.
The Motor designation for the 2.0Si is B20A5
I chose to do this conversion because my car was running terrible below 3500 rpm. It would stumble and run pretty rough at any constant speed below 3500 rpm. Under acceleration or steady speeds above 3500rpm, it ran fine. The gas consumption was pretty bad too. I figured that a modern 4 wire Oxygen sensor might fix these problems. And it did. The motor runs WAY smoother and is better on gas. I am VERY happy with the results and I encourage you to do this conversion.
My car is turbo and I believe that had something to do with the motor running weird, but just the fact that it made such a difference on a turbo car means that it should help N/A cars run better too.
The 2.0Si Preludes came from the factory with 2 single wire Oxygen sensors that are mounted in the exhaust manifold. The sensors give off a signal when they are heated up. So no signal is really given off until everything is fully warmed up. And even then, the signal is sluggish. I know this because I have a digital Air/Fuel ration meter in my car. That meter taps into the O2 sensor wire and that is what it reads. With the 4-wire sensor, the digital meter moves VERY fast and is much more responsive. The 4-wire sensor has a built in heater that keeps it at the minimum heat range to give optimum signal output. That is why it responds so fast and gives such a good signal.
You can use ANY 4 wire O2 sensor from any Honda made after 1992. I am using a used sensor from a 94 Civic 1.5DX and it is working fine. So if a sensor from the saddest Honda motor made works, then any other one should work too.
The hardest part about the conversion is getting the sensor boss into the exhaust system. On the 90-91 Si cars with the 4 wire sensors, it is mounted in the header pipe just behind the oil pan. So a hole has to be drilled and a sensor boss welded into the pipe. From the factory, the sensor is mounted straight down. That would be VERY hard to duplicate without pulling the header pipe out. So I mounted mine at an angle. I believe that will not hurt anything or affect the signal quality at all. Any muffler shop should be able to perform the hole drilling and welding for you. You can get the sensor boss at most speed shops that carry exhaust accessories. Or you can order one from a speed shop like Summit Racing or Automotive Engineering.
Once the sensor is mounted, it is time to wire it in. The 4-wire sensor has:
1 white wire - sensor signal output
1 green wire - sensor ground
2 black wires - sensor heater (power and ground)
I did a little test before I installed the sensor. I connected one of the black wires to power and the other to a ground. The sensor heated up so I figured that was the way it needed to be connected. Then I switched the wires for the power and ground and it did the same thing. So I concluded that it does not matter which black wire goes to power and which goes to ground.
So since one of the black wires has to go to ground and the green wire goes to a ground, splice the 2 wires (1 black and green) together with a longer piece of wire and run it to a known good ground.
Next run the other black wire to a SWITCHED power source. It is important that it is a switched power source and NOT constant power or the sensor’s built in heater will burn out.
Now this part is kinda tricky. To hook the signal wire up, you want to cut the wires from the factory single wire sensors right by the sensor so the wires are nice and long with the plastic plugs on them. Then skin the wires and splice them together with a piece of wire that is about 4 ft long. You need to run this wire and splice it to the white wire coming out of the new O2 sensor.
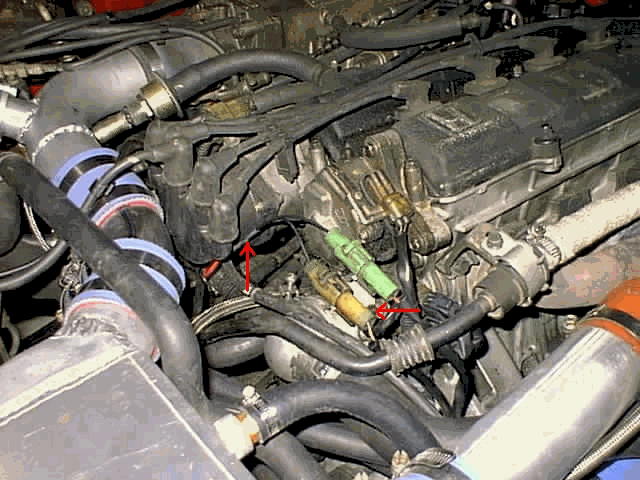 The
plugs that are connected to the wiring harness are mounted on a
small bracket that is bolted to the from motor mount bracket. You
can relocate it so that the wire that goes to the white wire is not
so long and makes for a cleaner installation. It takes a little
trimming of the bracket but you can mount it using the bolt on the
radiator hose neck that the ground wires are secured with. I am
referring to the area where there is a cluster of 3 sensors just
below the distributor. See the picture below for the mounting
position.
The
plugs that are connected to the wiring harness are mounted on a
small bracket that is bolted to the from motor mount bracket. You
can relocate it so that the wire that goes to the white wire is not
so long and makes for a cleaner installation. It takes a little
trimming of the bracket but you can mount it using the bolt on the
radiator hose neck that the ground wires are secured with. I am
referring to the area where there is a cluster of 3 sensors just
below the distributor. See the picture below for the mounting
position.
Well, that’s it. Your car should run smoother and get a little better gas mileage. If you get a ‘Check Engine’ light and the code is either 1 or 2, then something is connected wrong or the sensor you are using is bad. If you have an Air/Fuel Ratio meter, the lights should dance as you move through the throttle range.
Copyright © 2000, all rights reserved.